.jpg)
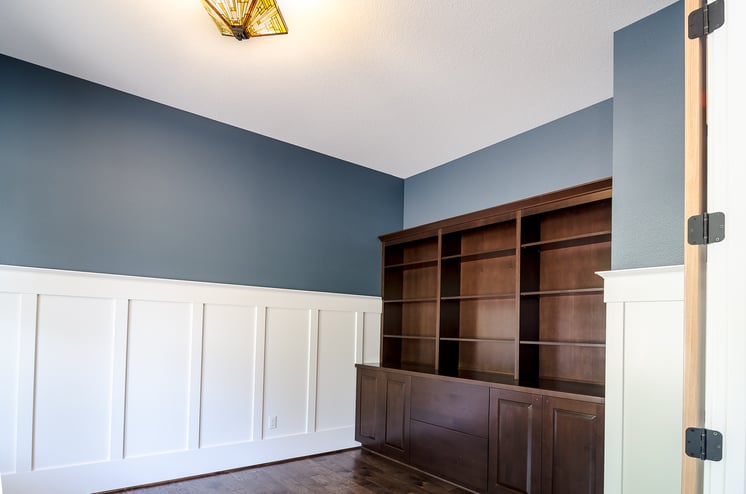
Bathrooms can increase your home value - on average people spend 20k on a midrange bathroom renovation. These renovations recoup 67% of their costs. But it actually doesn’t take that much money to take your bathroom to the next level. In this blog we will teach you how to install affordable wainscoting panels that will add that special touch to the room. Wainscoting is also a popular design in formal dining rooms and dens. This type of project is relatively quick and doable in a weekend.
DO-IT-YOURSELF
What You Need
Tools
- Sandpaper
- Stud Finder
- Pry Bar
- Level
- Tape Measure
- Miter Saw
- Tack Cloth
- Hammer
- Paint Brushes
- Circular Saw
- Razor Knife
- Nail Set
Materials
- 1x6 Boards
- Base Shoe Molding
- 2-1/2" Finishing Nails
- 1-1/4" Finishing Nails
- Cove Molding
- 1/4 Plywood Panels
- Wood Glue
- 1x4 Boards
- Wood Shims
- Construction Adhesive
- 1x2 Cap Molding
Step-by-Step
Step 1: Plan the Layout

Measure out each wall and then draw a layout plan that divides the walls into equal panels. Most plywood comes in 4x8 sheets, so it will be easiest to plan your panels accordingly. In smaller spaces like a bathroom, it’s best to have panels that are 32 or 24 inches in width while maintaining the 48 inch height. It’s best to prime panels before installing.
Step 2: Find the Studs
Use an electric stud finder to figure out where the wall studs are. The vertical stile will need to nail to a stud so they are secure. Try to avoid putting stiles over any electrical outlets.
Step 3: Installing the Panels
Start in the corner of the longest wall. Measure from the floor to the height of the wainscot, and use a level to extend the mark across the length of the wall. This is where the top of the panel and upper rail will go. Include a ¼ inch gap to allow for variations in floor height. Take out any existing baseboard and remove outlet covers. Apply construction adhesive to the wall below the level line and press the first plywood sheet onto the wall. Make sure it is level with the line and use finishing nails to take it to the studs. The next sheet will press up against the first plywood sheet and continue along the line. Install the plywood sheets to the end wall. If there are electrical outlets, measure each panel before you install and cut out the opening with a razor knife or jigsaw. When all the plywood sheets are up, nail them with finishing nails to the wall studs.
Install the horizontal top rail along the top of the plywood and use finishing nails to fasten the rail through the plywood and wall into the studs.
Step 4: Install Vertical Stiles

It is easiest to use vertical stiles that are already standard lumber sizes, like 1x4. Cut the stiles to size. Measure and mark where the stiles will go - ideally with each stile over a stud. If they aren’t on a stud, secure them by nailing them to the top rail. Start in the corner and work outwards and make sure they are level as you nail them in place. Make sure every stile is equally spaced.
Step 5: Install the Baseboard
Measure and cut the baseboard and cut 45 degree miters on the end of each board where they join together. Add glue to the baseboard where it meets the bottom of the stile and secure the baseboards by nailing them through the plywood and wall into the studs. Measure the cove molding so it sits on top of the top rail and use miter cuts where the rails intersect. Nail down the cove molding. Measure and cut the shoe molding that will go along the baseboards to bridge where the panels touch the floor.
Step 6: Finishing Touches

Use wood putty to fill the nail holes and file the surfaces so they are smooth. Then you can paint the wainscoting.
Additional Resources
Checkout this video for step by step instructions.
Visit our website for other bathroom customization ideas.
About Adair Homes
With 51-plus years in the industry, Adair’s long-term commitment to treating each customer with honesty, integrity, and respect has paid off, 22,000 customers strong and counting.
At Adair Homes, our mission states: it is our privilege to build our customers the home they have always dreamed of. We believe in providing the greatest value for our customer’s dollar and finding innovative ways to value engineer homes. We believe that we can offer an outstanding customer experience that is both enjoyable and rewarding—and offer this one-of-a-kind customer experience as the largest on-your-lot builder in the West. For more info, get in touch with us here or call 1-844-518-7072.